- Details
-
Hits: 24186
Eventually you'll want to change a menu item, usually the main menu across the top of your page. Joomla ships with several different menus, but typically the main menu is called, "mainmenu." See how easy this is? As usual, you need to sign in to the administrator side of things. To change a menu item, mouse-over "Menu" and select the menu you want to edit. Nine times out of ten, it will be the one with the asterisk, meaning this is your main navigation menu.

The menu selection window will appear. Your window will look completely different than the examples shown below, but the process for changing the items remain the same. To change a menu item, just click the one you want changed. Or, if you're adding a new one, click the "New" button in the upper right.
Note: In the example below, you will notice that "Graphic Design" has a red circle with white X under the column "Published." Just about everything in Joomla, including menu items, can be "unpublished." Everything is still linked up and working; it just doesn't show up. You would need to publish this in order to see the link and the changed you make. Click the red circle, and it will automatically change to a green check mark.

Now you should either be editing an existing menu item or adding a new one. Either way, you're probably staring at the Menu Item Edit window. It's a very exciting page. You'll want to sit back, drink some coffee and just enjoy it for an hour or so. When you're ready, please continue our tutorial.
Changing text on your menu
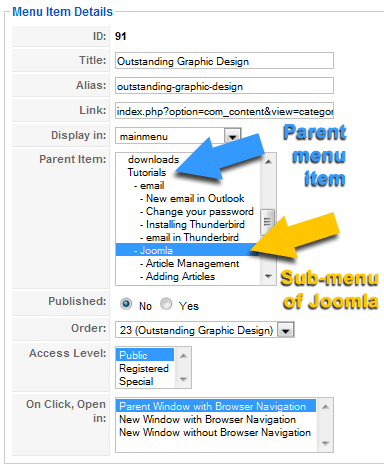
In this instance we're going to change the menu item that says "Graphic Design" to "Outstanding Graphic Design." Because, you know... that's what we do. Changing text is easy; there's just one thing you'll need to remember. You'll need to delete the "Alias" text field. This is machine-friendly text that strips out spaces, special characters and anything else it doesn't like.
- Title: Type in your new text
- Alias: delete this text. Joomla will create new machine-friendly text when you click save. (See how friendly machines are?)
- Click Save or Apply. As in other areas of Joomla. "Save" saves the document/edit window and closes the window. "Apply" saves the document/edit window, but keeps the edit window open.

Changing what the menu does
Most of the time, you're going to have your menu point to an article, but you might also want the menu item to show a contact page, calendar of events or even another website. In order for your menu to display what you want it to, you have poke additional buttons. If you're the type of person who enjoys click a mouse, web development is for you! There's no end to the enjoyment of opening edit windows and poking buttons.
For this example, we're going to change our newly changed "Outstanding Graphic Design" menu and point it to a category of articles. If you haven't figured out the relationship between Sections, Categories and Articles, stop by here and read all about it.
Basically for articles, you have 8 choices. Most of the time, however, you'll only be using 2 of them. The most common choice is to show a single article. The second most common choice is to show all the articles in a specific category. For this example, we're going to do just that. Pick a category and show all the articles in it. (you're going to need to setup your category and/or articles if you haven't done so yet).
To show all the articles in a category you'll need to click the "Change Type" button.

The next window that opens is where you can change the information that displays when you click the menu item. Here you can select contacts, products in a shopping cart, news feeds, calendars or different articles. Your selection choices are dependent on what is installed on your website, but all the Joomla sites have the same article choices.
- Click Articles. This will open the article choices.
- Click "Category Blog Layout." This will show all the articles in a single category. If you want to show a single article, click "Article Layout"

As soon as you click an option, this window will close and put you back to the menu item edit window.
If you picked "Category Blog Layout" you'll be asked to select your category. If you picked "Article Layout" you'll be asked to select your article. You'll need to click the drop-down menu button to see all your choices.

You've told the menu item what to display. Next you'll want to tell the menu how to display it. That's what the Leading, Intro, Columns and links fields will do. If you mouse over each word, a tool-tip will pop up and you can see what each one does.
 You may want to give your page a page a custom page title. This is what shows up in the browser when someone clicks that menu item. To do this, click the "Parameters (System)" tab open. Otherwise, the page title will default to whatever your article title is, or your category that you selected. For SEO, you'll more than likely want to create a custom page title that has a key word phrase that will help people find this page.
Type in a better page title: in this case I used: Graphic Design Services located in Boise, Idaho.
I don't want the page title to show on the page, so "show page title" is set to off.
The Page Class Suffix is so you can custom style this page with CSS. If you don't know what this means, leave it blank. Finally, click "Apply" in the upper right.
If you haven't clicked "Preview" go ahead and do it now. It will open a new window or tab, depending on your browser settings. You may have to refresh your page in order to see the changes. If you like what you see, close the window and go outside and bask in the glow of yet another successful venture in the bowls of Joomla article and menu management.
To make a sub-menu
Do everything above, but just select the menu-item you want this one to fall under. It will be highlighted in blue when you make a selection. For the example below, I'm going to make "Outstanding Graphic Design" a sub-menu item under "Joomla" Which, in turn, is a sub-menu of "Tutorials."
- Details
-
Last Updated: Wednesday, 14 September 2016 09:40
-
Hits: 10017
Obviously, you're going to want to add content to your website. Nothing could be easier!*
*Technically, there are plenty of "easier" things, like falling off a log, but adding articles and a link so people can find your new article is pretty easy. Just follow this tutorial and you'll be adding thousands of pages to your site in a matter of a few months!!
First, add that article!
- Sign into the administration side of your website: That's usually, www.yoursite.com/administrator
- You should see the Control Panel. Click "Article Manager." You can also find the article manager by mousing over "Components" on the top menu.

- You should now be looking at a spread-sheet style interface showing you some articles and some controls in how to manage those articles. If you have a small site, you might see everything in just this one page. More than likely, however, you're going to need to manage what you're looking at.

- Since we're adding an article, theoretically all you have to do is click the "New" button in the upper right. But since we're here anyway, let's briefly go over how to filter your articles to make things easier to find. If you're looking for a particular article and can remember the title or partial title, just type what you remember in the "Filter" box on the left. This will search your titles for whatever you typed. If you can't remember what the title is, but know it's in a particular section and/or category, you can click the drop-down menus where it says "Select Section" or "Select Category" and your article results will only show those articles under that particular selection. For this example, we're going to make a tutorial on article management, I'm going to select the section" Tutorials and the category "Joomla Articles."
- Now, I'm going to poke the New button.

- You're now presented with the article edit window. Here you can create any article you want and tell the system where it should put the article among other things. The reason I pre-select my section and category is because when I poke "new" the section and category is already filled in for me. This is useful if you're making several articles for the same section. For more information on how sections and categories work with Joomla articles, go here.
Adding Words to your new Article
Here's a word of warning that many people will just ignore. Don't copy and paste from Microsoft Word. Not only will you copy and paste your words, but also a ton of code you don't need. In fact, the code from Word may break your site. Fortunately, there's a handy little button in the article edit pane that will help. (must have JCE editor installed)
To copy and paste from word to your Joomla article:
- Copy the text from word.
- click the "Paste from Word." button. Depending on which version of JCE editor you have, the button might be in a slightly different place. Basically poke the button with the blue "W." If you mouse over the buttons, you will get tool tips that name each button.
- The paste window will appear. There's even handy instructions telling you how to paste. Hint: hold your Control keyboard button down while pressing the letter "v."
- You may have some cleanup to do, depending on what you want to do with your text. The most common problem are returns showing up in the wrong place or not at all. The text edit buttons function about like any other. Highlight the word(s) and then click the Bold, or Italics or Underline button, etc.
Adding Links to your text
- To add a link to another website. First copy the URL. Then highlight the word(s) you want to be the link and click the link button.
- A link edit window will pop-up. Here you can just paste or type in your URL and change the target if you want. The target tells the browser if it needs to open a new window or not when fetching the new URL.
- Click "insert" and you have just created a link.
To add an internal link, follow the steps above, but instead of typing in a URL, open up the link browser selections. You can easily link to an article or menu within this edit window. Opening up "Content," will show you sections, categories and eventually individual article titles. This example is an article called "Book Covers and Publishing Material." It's found in the category "book cover design" under the section "graphic design." Just select the title and the URL across the top will automatically fill in. Click insert and you're done.
Adding Pictures to Your Site
One item you'll want to add are pictures to your articles. While you can link to other pictures on the web and have them show up in your article, it's usually not a good idea. First, you'd have to ask permission to use the digital content and secondly, if they change their picture or delete it, you'll be left with a big hole in your article. So to add a photo or graphic, we need to put that photo in your site (before putting it in your article). Use only .jpg, .gif or .png for your pictures/graphics.
- Open a new tab to your media manager. You can find this by mousing over "Site" in the top administrator menu and clicking on "Media Manager."
- Just about everything you put into your site will be in a folder called "stories." This is the default image folder for Joomla. You can make other sub-folders inside this one, but first, navigate to stories and open it. You can do this by either navigating (clicking) in the menu on the left or clicking on the folders in the larger image view.

- Once inside the Stories folder, you may want to create your own folder to keep things organized. Just type the new folder name in the upper right (show above in red) and click "Create Folder." Note. No spaces, capitol letters or characters. Just use lowercase letters with an underscore between the words. Same for you image names. No spaces, no caps, no fun!
- Once inside the correct folder, you need to locate the picture on you computer. Click on "Browse..." (shown above) and it will open a new window you can navigate to where your photo is stored on your hard drive. Select the correct photo. (is this fun, or what?)
- Click "Start Upload." The photo should upload and be put inside the correct folder.
Note: Don't use HUGE photos for tiny images on your website. A lot of digital cameras these days take enormous photos many 1,000s of pixels across. This is a needless and wasteful use of bandwidth. At the most, you might upload a picture 900px across. Use an imaging program like Photoshop to resize these huge digital files into something far more manageable. Your page will load quicker and the President of the Internet will thank you personally.
Adding Pictures to your Article (Finally!)
Okay, now back over to your article manager. We're going to add that photo you just uploaded inside your article.
- For this example, I'm going to use an article called "Boise, Idaho based Graphic Design Company." For some strange reason, I never put a picture on this article. I'm now going to add one. Here's how it looks before the picture.

- Okay. That's boring! Now to spruce it up a little. First we have to have the article open in the article manager. Since this article/tutorial is all about creating a new article, I'm assuming you have one open right now. Inside the edit window,place the cursor where you want the top of your photo to appear. In this case, I'm going to put it at the beginning of the first sentence.
- Next, click the "Insert/Edit image." button. Depending on your version of JCE editor, the button might not be in the exact position shown below.
- The next window is the Image Manager (see below). Basically, you just have to find the photo you just put on your site and click insert. Of course it helps to remember which folder you put the image in. Be sure to pay particular attention to the layout preview. This will show you how the picture is going to look on the website once someone views it.
- You will note it defaults to something most people will not want. The text is not wrapping around the photo (see below). There's the photo, then underneath, there's the text with a huge empty space to the right. Most of the time you'll probably want the text to wrap around the image a little. Below is a screen shot of the article after I placed the graphic at the beginning of the paragraph and just clicked save. Can you say "ugly?"
- We will want to "float" the image either right or left and give it a little space between the words. Back in your editing window, select the photo and click the same "insert/edit image" button you used to insert the image. The same Image Manager will appear and now you can make some adjustments to it.
To float an image right or left
- We're going to float the photo left so the words wrap to the right. If you're unsure what this will look like, just click the "Alignment" selection to float left and see what the layout preview looks like. First, select the Alignment and change it to float "left."
- Next, un-check "Equal Values." (You don't have to, but often you'll need to have unequal values for your different sides to make it look right.
- Put in the number of pixels you want as a buffer between your text and the image.
- Look at your layout preview to see if this is what you want or not.
- Satisfied? Click "Update."
- You've just made an image float to the left with text wrapping around to the right. Let's take a look at the article:

Ahh... much better.
- The last thing you'll want to do is save it of course. If you didn't pre-select your section or category, you'll need to do so now. Click either save or apply. Apply saves your document, but keeps it open in the edit window so you can make further changes while checking how it really looks in the browser. But wait! How do we check it in the browser? There's no link!
Making a New Link to your Article
I need to check this article in the browser to make sure it looks okay, and I'd like people to be able to find it. To do this, I need to create a menu item that, when clicked, will take people to this article. It's fairly easy and something you'll need to learn how to do. Even if you don't have a website and don't know what a computer is and live in a cave and only drink water and eat berries, you still need to know how to do this.
- Back in the admin area, (I usually keep several tabs open at the same time, one to preview the site, one to work on articles, and another to navigate to other parts of the administration back-end) mouse over "Menus" up at the top and click on the menu you want to change. Typically it will be the Main menu.
- You'll see all the menu items for this particular menu. Since we're making a new item, click "New" in the upper right.
- Next, you will need to select the menu type. You can have a menu go to all sorts of things besides articles. For now, we're just going to make a menu item that goes to this article. Click Articles. Then click "Article Layout."
A new window will appear for selecting the correct article. There are several items you need to change here:
- First, type in how you want the menu to read. Keep it short and expressive.
- Where do you want your menu to appear. You can have sub-menus of sub-menus if you want. For this example, this new article will be a sub-menu of "Tutorials>Joomla." (I once had a menu appear on a submarine. It took days to figure out what was going on. Luckily, I found on online tutorial, much like this helpful one!)
- I need to find this article, so I'm going to click "Select."
- Yet another window will pop-up. It's going to help if you remember your section and category if you have a large site. Otherwise, you'll have to browse through possibly hundreds of listings. You may have to hire a team of people who do nothing but remember where you put things. I know that would help me. "Hey, team-member person! Where did I put my keys? Hey, remember-guy-person-team-dude. Where did I put that article?"
I know I should remember my team's names, but then I'd have to hire even more people to remember their names. Okay, I digress.
Just find the article title you want and click it. The window below will disappear and put you back to the menu item type editing window. Only now, there's something in the parameters (basic) field -- you're article you just clicked on.
- Last but very important, you'll want to give this a page title. Usually by default, the page title will be whatever you called your article. However your site can be setup differently, so it's best to just put in your page title here. It can be whatever you want, but keep in mind this is important for search engines when they're indexing your site. Typically you'll not want to show the page title.
- Click save or apply and go view your page in a browser.
You have just created an article and a new menu item linked to that article. (Not that I needed to tell you that, but hey, I have to finish this article somehow)!


